Monday 28 January 2013

Thwarted by Rain

Our ambitious schedule to finish the main pavilion over the Australia Day long weekend was thwarted by the rains from ex-tropical cyclone Oswald. A day of form work construction and work on finishing the hallway was followed by two very long days of hemping. The first saw us complete the long run between the sliding doors and the upper windows. It was only possible to get all this done because my sister, Ing, helped out, churning out mixes all day. The second day we completed the sloped walls up each side up to the roof level, surprisingly this took two more mixes than the previous day (16 as opposed to 14). Our work speed has certainly improved greatly since we first started, the work has go harder - working at height, and more difficult working up under the roof.

Back pavilion finished and hallway nearing completion
Eastern wall of main pavilion and hall formed up to roof height
 Working around the awning we used the same method we had with the back pavilion. Putting up a crenellated form work with cut outs to fit each of the awning rafters, on the outside and forming up the whole of the section between the doors and windows on the inside. We stood on scaffolding and reached through the window opening and placed the hemp in from the outside. When the wall was filled to the top of the awning rafters we placed an extra piece of form work on the outside to bring the wall height up to the bottom of the window, allowing us to finish the whole section in one go.

Overnight and early rain on Sunday threatened the days full schedule, but the rain cleared allowing me to climb on the entry roof and finish the form work for the parapet wall. Experience made this easier. On the outside I put form work up to the full height, then just raised the form work up inside. On the highest sloped sections I just added an extra piece of form work on top of the work that had just been done, so that the roof could be consistently reached up the slope. Outside I had two slopes to deal with, that of the roof of the main pavilion and that of the parapet wall where the roof of the bathroom and entry intersected. This was dealt with by using two pieces of form work to complete that section, one sloped to match the roof of the main pavilion and the other sloped to match the entry roof, the two joining together where they were level.
     
Pipes to be hemped around on inside of parapet wall
Ben working on the top sections of the sloped eastern wall
On Monday, with only the top hand depth to finish on each of the sloped sides and hemping around the lintel over the top windows left to complete the back pavilion, bad weather set in. Observations over the past two years have consistently shown that most rain comes from the south or south west. Despite high windows and large door openings to the north, when we put a tarp over the hemp stored in the main pavilion we made sure that we covered the top, south and west sides and never had problems with rain blowing in from the north or east. This holiday Monday the rain came from the north and blew in at such an angle that even inside the house high on scaffolding just under the large eaves on the north side, at times the rain blew in on us. So, with only the small section above the upper windows left to finish the main pavilion, we could not hemp this section. I managed to put form work up for the section on the inside but consistent rain prevented work outside, particularly as I would be working very high up, in fact at the highest point of the house.

As a consolation Ben was able to finish the sloped east and west walls of the main pavilion and also used our time to finish the hallway, it was protected from the driving rain by the main pavilion to the north. With so much rain I could not even take photos of the work we had done.

We got close, but could not achieve our goal of completing the main pavilion. We now have the next two weekends left to finish off the main pavilion and the front pavilion, which will complete all the hemping on the house.  Not sure if we can do it all in that time, but we will try. Also not sure we will have enough binder. On my calculations the volume of the walls is 32m3, this did not take into account eh volume taken up by the frame as that was an unknown quantity. I was initially going to order enough binder for 35m3 of wall, which was 520 bags, but increased this to 540 bags to allow a greater margin of error. If we had not lost 17 bags of binder to the walls that we made that were too dry and had to be knocked down we would definitely have enough binder. It is my estimate is that it will take us about 38 bags of binder to finish the house and we only have 38 bags of binder. This does not leave any margin for error. After next weekend we will have a better idea whether we will have enough binder and enough time.


Wednesday 23 January 2013

Hemping in 40 degrees

With a mid February deadline to finish the walls so we can lend the mixer, we arranged a four day weekend to work on the house. The very generous Tony was also coming down to help us. So, on Friday the three of us worked through incredible 40 degree heat, finishing the section between the sliding doors and upper windows on the back section of the house. In the heat the mix dried out more quickly and we made the mixes with one and a half buckets of water rather than the usual one and a third buckets, to take account of the hot weather. Even without windows or ceiling insulation it was noticeably cooler inside the house and working up high meant that we caught whatever breeze there was. After working in such adverse conditions we knocked off at 4pm and had a long and well deserved swim at the beach.

Section between sliding doors and upper windows
Back pavilion hemped behind awning
 After the extreme heat of Friday, Tony and I worked on putting up the awning on the main pavilion on Saturday while Ben worked on the sections between the upper windows. There were some difficult sections above the hallway where the the large number of studs made it awkward to be able to access both side of the wall from the inside. This was partially resolved by standing on the hallway roof and filling the difficult to access parts of the form work from the outside.

With previous experience the awning went up easily. We matched up the top of the awning with where it joins the roof above the front door, then put in place the rafters on either side of the valley and used temporary timber extensions and careful measurement to locate the positioning of the valley. We used the cool of Sunday morning and the assistance of our friend Beth and her two bows, Ira and Alec, to put up the long fascia on the awning. Ira helped out putting up the valley rafter which had to be located in mid air while Alec, Beth and Ben worked on the eastern wall of the main room. It seemed a bit unfair introducing people to hemp building, on scaffolding while working up to a sloped ceiling, but this was what we needed to do and from now on all the work is on ladders or scaffolding.

Awning on main pavilion


Front view of awning, valley in left corner

On the last day of our four day weekend Ben and I put in a mammoth effort working up to the ceiling above the upper windows in an effort to finish the back pavilion. Working on the high end of roof under the ceiling was surprisingly easier than the low end. The scaffolding made the work easier and we had more head room. Extra support in the form of angled pieces of timber were put next to the lintel to provide support for the hemp were it was not able to key in from one side to the other. As the outer edge of the wall is higher than the ceiling level inside we had to mound up the hemp against the outside wall to ensure that it was sufficiently supported. The top corner sections also proved difficult as due to the set up of the rafters a section could not be accessed from either inside or outside and had to be stuffed and tamped from the side before the adjoining form work was put up.

Back pavilion formed up to the eaves lining
Working above the upper windows
We finished the back pavilion bar a tiny corner, as it was late in the day and we did not want to have to make a new mix when we only needed about 1/4 of the mix. Plus the form work had not been moved up the last little bit.

Western bedroom finished, just waiting for form work to be removed
Section over the hallway finished
Eastern bedroom finished, except the corner

Tuesday 15 January 2013

Hemping difficult locations

We had not hemped above some of the wider windows with large lintels as I was not sure how to provide extra support to the hemp above the windows as I was  not leaving a permanent form work. I eventually chose to use a wedge of wood sloping down toward the lintel to hold the hemp up and onto the wall where the lintel prevented the hemp keying in from one side of the frame to the other. This is an adaptation of the method used by Rodney Gregg on the Tasmanian hemp house, the walls he built were much thicker and so the timber pieces could be larger. Here I tried to get the timber as thin as possible using 35mm cut with a 45 degree angle and a small flat section at the bottom to attach it to the lintel. I found that the 45 degree angle made thee timber too tall and later used a 30 degree angle and found this just as effective. Extra care had to be taken to use a very thin tamper to put hemp in the 20mm gap between the timber and the form work, given that my walls are only spaced 55mm out from my frame on either side. So as not to cause a weak spot by this thin section of hemp I attached the timber pieces in several discontinuous sections above the window. 

First draft 45 degree timber section
Attached to the lintel on top of the temporary form work
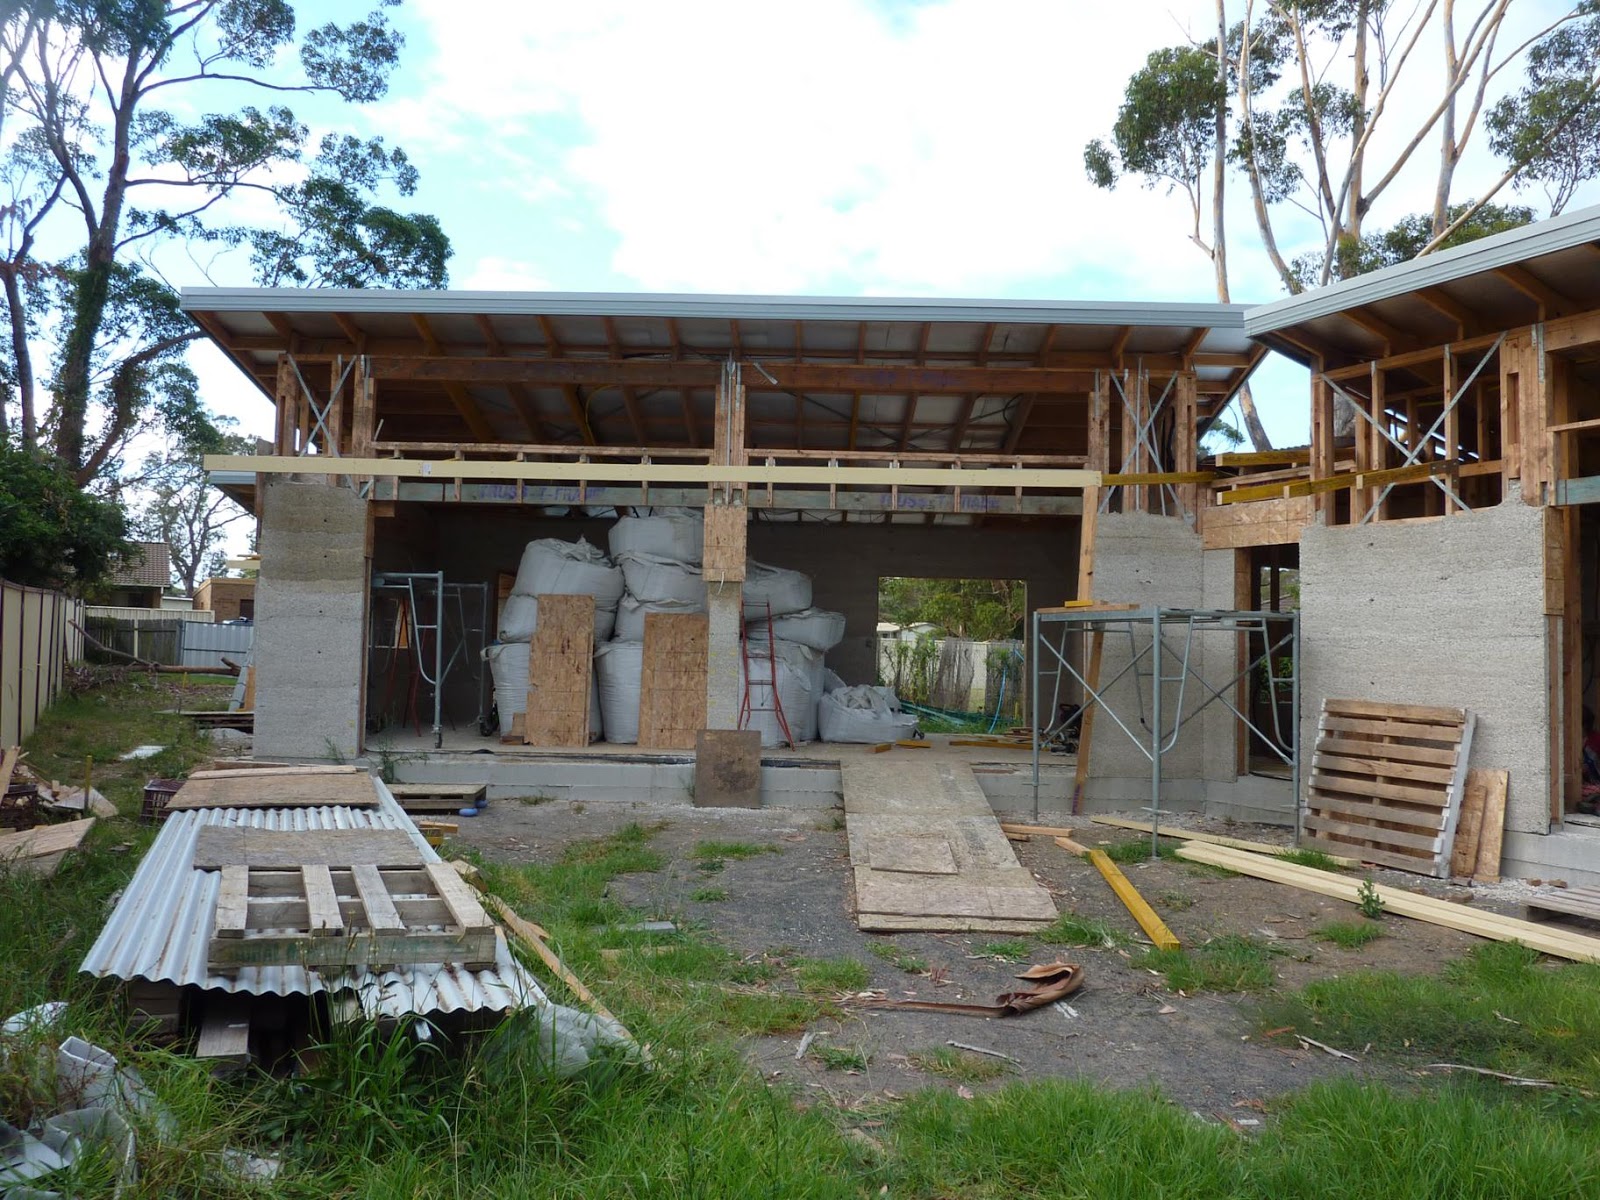
We have been building the walls over weekend and so usually have a week or two gap between each time we see the walls however, over the Christmas/New Year break we spent 9 days building and got a chance to watch the walls dry out. For the first few days after the walls were cast they maintained the darker wet look, then quite suddenly took on a lighter dry look. For the pictured section of wall we also had to add in a hole in the wall for the wall mounted exhaust fan (the ceiling joists of this section were not deep enough for a ceiling mounted exhaust fan). The hole form work was made using some circles cut from OSB with ducting taped between and stuffed solid with scarp plastic packaging from the build. A little hole was cut in the ducting to take the electrical cabling for the exhaust fan. Hopefully we can leave the ducting in situ and use it for the fan.


Work done on 26 and 27 December
Dry by 3 January and hole for exhaust fan ducting
Not long before Christmas, Len, our plumber organised the Council inspection for the plumbing. The plumbing passed, no problems, but the council inspector picked up a problem with the frame. The ridge beam for the hallway was attached to just the studs and top of the door frame at either end. The inspector thought that over time the weight from the ridge beam may cause the top of the doors to sag. The answer was extra timber reinforcement. On each end of the hall I added what in effect became a timber lintel. I cut this into half the studs and made sure that it rested on a full length stud, which the door header did not. This was a difficult job in the standing frame, made more difficult on the second side I did by the need to avoid plumbing pipes and electrical cables. But my added lintels were securely held in to the board to which the ridge was attached and to the studs with, my favourite, batten screws.

Extra timber support added
As the walls have got higher we are having to lift the form work up higher, a job for which scaffolding has become a necessity.

Hemped above the kitchen window
Form work gets higher
When I drew the plans I always knew that the parapet wall above hall would be difficult to build and this proved correct. The location of the rafters meant that thee very top of the wall could only be done from the outside, which in this case was on top of the hall roof in a very small space.

Parapet wall form work in a small space
Form work right up to the rafters
Small risers were used to get closer and closer to the ceiling, then I had to work from the outside. I had to shimmy in under the the guttering and try to bend my arm at the right angle to shove and squash hemp into the last little bit of the wall.

Tight squeeze, bucket of hemp barely fitted
The most awkward possible position from which to build hemp walls

Despite the difficulty with the access for putting up the form work and the filling with hemp, the walls were well tamped and looked great. Just the spacer holes left to crawl back under to fill.


Hemped parapet wall
Inside the hallway
Other side of the photos above, showing no hint of the abutting wall
The protruding awning rafters  meant that form work had to be cut around each of rafters. This was done by measuring out the spacing and marking it on a lighter piece of timber, to avoid lifting up the heavier form work, cutting out the depth of the rafters and placing the form work up to the top of the rafters. Hemp was then placed in the form work and once the top of the rafters was reached an additional piece of form work ws added without removing the lower form work, this was so that no gap was left as the upper form work sat on top of the rafters.  

Form work cut around the awning rafters
The result on the inside was beautiful
With the skillion roofs we have lots of sloping walls to finish off to the roof line. As each rise reached the ceiling we have finished that section to the ceiling and continued along the rise. Like the other walls we have finished to the ceiling we mover the external form work up to the full height of the wall then finished the wall from the inside in two rises; the first with the internal form work up to just under the bottom of the top plate and hemp filled up and packed under the top plate and second with the form work up the the ceiling line allowing the hemp to be placed in beside and over the top of the top plate.

Formed up to the ceiling in the centre and just off the ceiling on the right
Wall fully formed up to the underside of the eaves on the outside


Monday 14 January 2013

Awnings and Bastard Valleys


By Christmas we had almost done as much of the walls as we could without putting the awnings on. Originally the delay was getting the awning brackets on, but this was easily solved after getting  a few quotes from steel fabricators. The brackets were plasma cut to the engineers design from 3mm Galvabond steel by WH Williams at Silverwater.  For added protection from rust I sprayed the cut edges with Cold Gal. I then sought a builder to do the carpentry work but could not find anyone willing and available to do the work. I sought advice from a carpenter friend and with the promise of assistance, resolved to put the awnings up over the Christmas break. Due to other commitments the assistance went from in person to telephone help. I was on my own, so I consulted Alan Staines book, “The Australian House Building Manual". It showed some clear line drawings of what a valley should look like.

Friends from my son’s pre school stayed on site with us for a few days after Christmas for a working holiday and Will go roped into assisting me with the awnings. The purpose of the awnings is to provide shade to the north side of the house in the warmer months, as well as to provide a sheltered area under which to enter the house through the glass sliding doors and to break up the large north facing walls and visually anchor the house to the ground. The awnings too some thought but were not beyond our capacity.

We started with the awning on the back pavilion. Although Will did not have a building or carpentry background he took a thoughtful and practical approach to things and was helpful to bounce ideas off. The attachment of the brackets was straight forward, once I worked out the correct position from the ridge on the hall, taking into account the depth of the batten to go on top of the awning rafters and the width of the hemp wall, so that the roofing on the awning will line up with the roof of the hall at the ridge and eaves.  This meant I had to build a bastard valley where the two roofs joined. The awning rafters were bolted onto the brackets and the brackets bolted to the studs at 600mm centres. Because some of the studs were only held between the sliding doors and upper windows, we reinforced these studs where they met the window sill with a metal plate (cut from spare brackets because we reduced the length of the awnings), to prevent the stud from pulling out from the sill, given the extra weight on it from the awning. 

Awning rafters attached
A job well done
 Bastard Valley really is the technical term for the valley between two roofs with different pitches and it lived up to its name.  We worked out the line for the valley rafter then, to complicate matters, had to remove part of the hall roof, that had temporarily been put on to give us a dry space to work under, and remove some of the hall battens and shorten some rafters, while still maintaining the rafters to attach the ceiling lining to. To do this we left in one of the hall rafters, which would otherwise have crossed the valley rafter, and ran the valley rafter from there, which involved cutting the valley rafter at a compound angle (angles in two different directions). After some head scratching as to what the angles were and then how to get the saw to produce them, we cut the angle correctly and the rest of the awning rafters were cut to fit. The following day a little bit of adjustment (by loosening the bolts, moving into place, and re tightening) was needed to one or two of the rafters to get them to line up at the right height with the timber fascia, which was also used as the final batten. The rest of the battens will ho on after we have hemped the wall above, by temporarily leaving them out we can duck through the rafters to put up the form work. We will place the hemp mix from the inside. 


Newly installed bastard valleys
Valley rafter joins timber fascia
 A few days later my partner and I tackled the other side of the awning. It was definitely easier but there was also more swearing as little things went wrong. We had some luck, the metal strap bracing looked like it would get in the way of the brackets, but amazingly the correct spot for the bracket fell between the cross pieces of the bracing. We used leftover triple grips where the awning rafter intersected with the hallway top plate. The first awning we nailed the valley rafter to the awning rafters, but for the second part of the awning used batten screws. Batten screws are so strong and with the impact driver easy to put in. They are me new best friend.

Lucky bracket location between the bracing
Second side of the back awning done
We are now 1/3 of the way through the awnings. Just the sections on the main and front pavilions to go.
More awning rafters ready to go up on the main pavilion